This tutorial will show you how to mark a miscellaneous lat/long waypoint within a legal description drawing.
Note: This tutorial assumes that are using a registered Pro version. If you are using the Basic or Unregistered version, not all of these features will be available. However, this tutorial will attempt to make it clear when a step or feature requires the Pro version.
Note: This tutorial was written for use with v2.8.2 of Metes and Bounds. If you are using a different version, your screenshots may look slightly different. But the basic functionality should be the same.
Start by opening the "Tutorial 2 Sample File.mabf" file located in the Tutorial 2 Sample Files folder. The tutorials folder is located in the same folder as the Metes and Bounds application. After opening the sample file you may want to do a Save As... so that you do not accidentally save your work to the included sample file.
This is the legal description used for this drawing:

The first thing we are going to do is find and enter the latitude/longitude waypoint of our layer's POB (Point of Beginning). In order to draw additional waypoints, we need a reference point. The reference point used by the software is a layer's POB. Since our plot's origin is the southeast corner of the section, we will start there. You can find the latitude/longitude of the section corner either using a GPS unit or by using some other resource. For this tutorial, we will say that our section's corner is located at Lat: 46.495005544, Long: -85.608046974. We will find our plot's POB lat/long based on these values and the plot's description.
To start, choose Project Waypoint from the Calculate menu. This will bring up the Project Waypoint form. Select the Call tab.
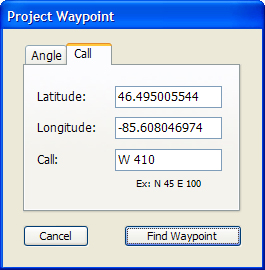
Enter the latitude and longitude for the section corner. We know from our legal description that our plot's POB is 410 feet west of the section corner. So enter in a call of West 410 feet (W 410).
Press the Find Waypoint button to calculate our plot's POB lat/long values. Record the new values and close the message box.
Now choose Set Current Layer POB Lat/Long from the Layer's menu. This will bring up the POB Lat/Long form.
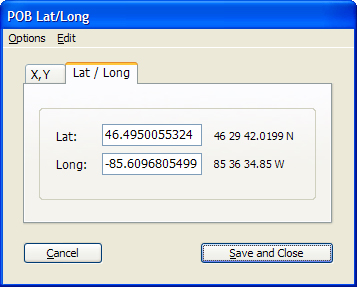
Enter the POB's Lat/Long and press the Set button.
Now we are ready to set our other waypoint(s).
Choose the Layer tab from the tab panel on the main screen.
Press the Waypoints button and choose Lat/Long from the popup
menu.

This will bring up the Waypoints and Tracks form.
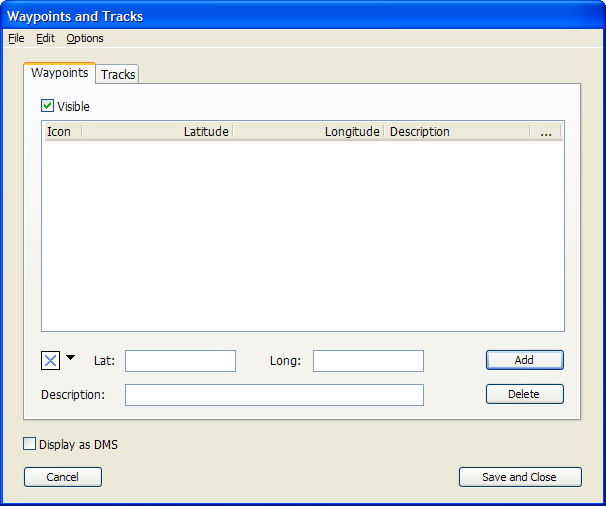
At this point we could enter our waypoint(s) by hand, but it is much easier to import waypoints from a GPX file. So we will do it that way. Note: Importing waypoints requires the Pro version. If you do not have the Pro version, you can enter the waypoint by hand using these coordinates (lat= 46.4958 lon= -85.6102)
Choose Import GPX File as Waypoints from the File menu.
Browse to the Tutorial 2 Sample Files folder and choose the "Tutorial 2
Waypoints.gpx" file.
At this point you can choose to import the description field from either the
name field or the description field of the GPX file. Different software stores these
two fields differently. Our example GPX file uses the description field, so make
sure that radio button is selected and press the Continue button.
At this point you should have imported 1 waypoint called Camp Site.
Click on the blue X icon of our waypoint to get a popup menu showing additional waypoint icons. Choose the red ball icon.
Now press the Save and Close button to save the changes to the waypoints and to close the waypoints form.
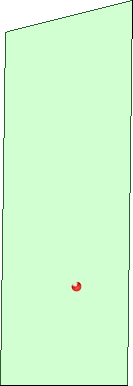
Your drawing should now look like this:
KML Export (Optional)
You can now export your drawing as a KML file. If you have Google Earth installed, you can use it to view the KML file.
Choose Export Current Layer as KML from the File menu. This will bring up the Export KML form.
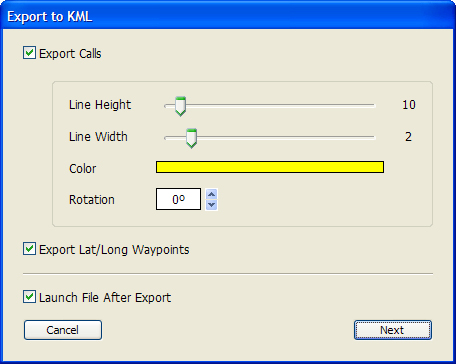
Verify that the "Export Calls" checkbox is checked.
Check the "Export Lat/Long Waypoints" checkbox. This will place a marker where
our lat/long waypoint is.
Check the "Launch File After Export" checkbox. If this checkbox is checked, the
software will attempt to open the KML file using Google Earth.
Press the Next button to choose a file name to export the KML file to.
After saving the file, Google Earth should launch and zoom into the saved plot.