This tutorial will show you how to estimate the area of two overlapping layers. In the process of finding the area of the overlap, we will also create a new layer of the overlap. Please note that this is only an estimate.
Note: This tutorial was written using v2.5.0 of Metes and Bounds. If you are using a different version, your screenshots may vary. But the basic functionality should be the same. Also, this tutorial assumes that are using a registered Pro version. If you are using the Basic or Unregistered version, not all of these features will be available.
Creating the sample layers
The first thing we need to do for this tutorial is setup our sample layers.
To start, set the drawing's origin to "Center of Drawing" instead of "Auto Center".
Now we need to create our two demo layers. Start by entering the following calls into the call entry field and pressing the Add button. These calls will create a simple square:
Calls for Layer 0:
N 100
E 100
S 100
W 100
Now choose Add New Layer from the Layer menu. Press the Add Layer Button.
Now enter the following calls for Layer 1:
N 200
E 100
S 100
W 25
S 25
W 25
N 25
W 50
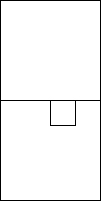
Your drawing should now look like this:
This next step is optional, but will make the overlap easier to see. Switch to the layer tab and choose Fill. This will bring up the Fill Layer Options form.
Check the Show Fill box. We will use the default green for Layer 1. Press the Save and Close button.
Now choose Layer 0 from the Layer popup menu and repeat the steps for setting the fill. Only this time, on the Fill Layer Options form, click on the color bar to select a different color. For this tutorial we will use a light yellow. Press the Save and Close button.
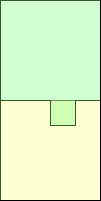
Your drawing should now look like this:
Creating the X,Y Waypoints
Now we are going to create the x,y waypoints that we will later use to
estimate the area of the overlap.
Make sure that Layer 0 is the currently selected layer.
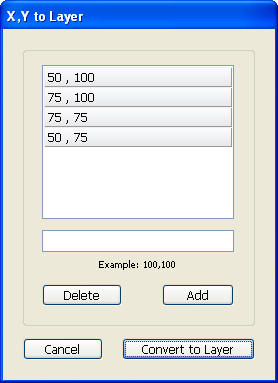
Choose X,Y from the Waypoints button on the Layer tab. This will bring up the X,Y Points form.
From the Options menu choose the Create Points from Endpoints option. This will create and label some x,y points for us to use. Now choose Show All Descriptions from the Options menu. This will cause the descriptions to be drawn on the screen next to each x,y point.
Your X,Y Points form should look something like this:
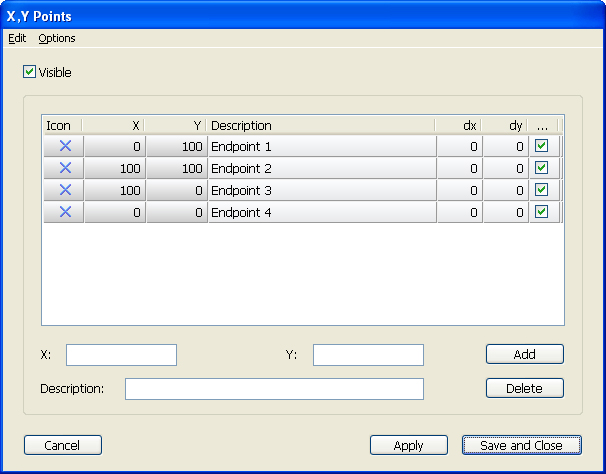
(X,Y Points Form)
Press the Save and Close button.
Your drawing should now look like this:
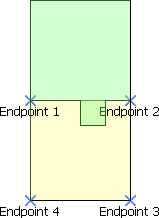
Moving the X,Y Points
Now we want to move our x,y points to the corners of the overlap. In this
tutorial we just happen to have the correct amount of x,y points. In the real
world, you may need to add or delete some x,y points to get the number that you
need.
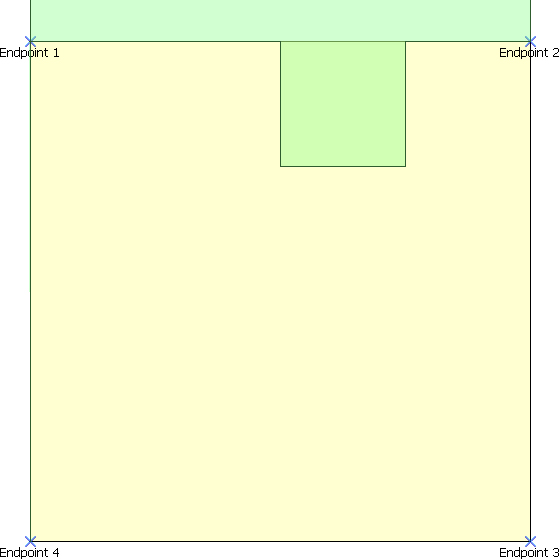
Before moving the points, we want to scale the drawing as large as possible. Do this by moving the scale slider on the Drawing tab. For this tutorial, we can use the largest scale of 1" = 14'. At this point, most of your drawing is probably off the screen. You can re-center the drawing by clicking on part of the visible layer and dragging it back to the center. Hold down the Shift key so that both of the layers will move at the same time.
Your drawing should now look something like this:
It is now time to move the x,y points. Start with the x,y point labeled "Endpoint 1". Use the mouse to move it to the top-left corner of the overlap. Move "Endpoint 2" to the top-right corner of the overlap. Move "Endpoint 3" to the bottom-right and "Endpoint 4" to the bottom-left. You can also re-open the X,Y Waypoints form and tweak the X and Y values numerically to get the points as close as possible to the point of overlap. If you accidentally grab and move a layer, you can undo the move by choosing Undo Last Layer Move from the Edit menu.
Your drawing should now look something like this:
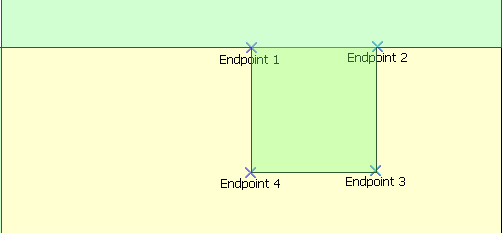
Important Note: When placing the x,y points, it is important that all of the points flow in either a clockwise or counter-clockwise order. In our example, swapping 'Endpoint 3' and 'Endpoint 4' would produce undesirable results. Having the descriptions visible will help you keep track of which x,y points to move where.
Creating a New Layer From the Waypoints
We are now going to make a new layer from our x,y points. To do this,
re-open the X,Y Waypoints form. Choose 'Create Layer From Points' from the
Layers->Current Layer Closure Tools menu. This will bring up the X,Y to Layer form and pre-populate it with
our x,y points.
Press the Convert to Layer button.
Press the Cancel Button to close the X,Y Points form.
Choose 'Convert Auto Completion to Call' from the Layers->Current Layer Closure Tools menu to close the layer.
This next step is optional: To make the new layer easier to see, choose a different fill color for the layer. This tutorial will use an orange color.
Your drawing should now look something like this:

Feel free to drag the new layer over top of the overlap if you want to.
Finding the Area
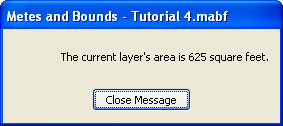
Now you can use the Calculate menu to find the
area of our new layer. Choose the most applicable option, such as 'Current Layer
Area - Feet' or 'Current Layer Acres'. This is the area of our overlap: