Tutorial #6
Working With Multiple Sections
This tutorial will show you how to create a drawing with multiple sections and how to position plots within them. While other tutorials have used background pictures to represent section information, this tutorial will use layers to create section information.
See Tutorial #1 and Tutorial #5 for similar projects.
Note: This tutorial was written using v4.6.2 of Metes and Bounds. If you are using a newer version, your screenshots may vary. But the basic functionality should be the same. Also, this tutorial assumes that are using a registered Pro version. If you are using the Basic or Unregistered version, not all of these features will be available.
Setting Up the Sections.
To create a new drawing, choose New Drawing from the File menu.
On the Drawing tab, choose "Center of Drawing" for the drawing's origin.
Click on the Scale popup menu triangle and choose the 1" = 1320' menu.
Rename the current layer by choosing Rename Current Layer from the Layers menu. Rename the layer as 'North Western Section'.
Now you are ready to create your sections. In this example you will be creating four different sections. Each section will be represented by a 1-mile square.
Start by creating the north western section. We will start by entering the calls manually, just to show one way to create a section. For the rest of the sections, we will use the built-in section layer tool.
Enter in the following calls:
N 5280
W 5280
S 5280
E 5280
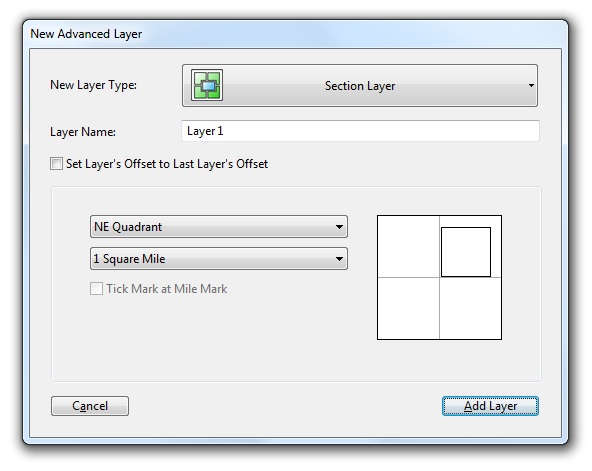
Now create a new layer for the north eastern section. For this layer, choose Add New Advanced Layer from the Layers menu. Name the layer 'North Eastern Section'. Choose NE Quadrant from the quadrant menu. Press the Add Layer button.
Now create a new layer for the south western section using the Add New Advanced Layer tool. Name the layer 'South Western Section'. Choose SW Quadrant from the quadrant menu. Press the Add Layer button.
Now create a new layer for the south eastern section using the Add New Advanced Layer tool. Name the layer 'South Eastern Section'. Choose SE Quadrant from the quadrant menu. Press the Add Layer button.
Your drawing should now look like four squares:

Next, you can customize the sections so that they are less obtrusive for when you start entering the plot data.
Click on the Layer tab.
Click on the Captions button.
Check the Show Layer Name checkbox.
Press the Layer Name Font button.
Click on the Color bar and choose a light grey color.
Close the Font Picker window.
Click on the popup menu triangle and choose Apply to All Layers from the popup menu.
Press the Close button.
All four sections should now be named. Next, you can customize some of the line properties.
Click on the Lines button.
Click on the Line Color bar and choose a light grey color.
Move the Dash Length slider to give the section borders a dashed look.
Click on the popup menu triangle and choose Apply to All Layers from the popup menu.
Press the Save and Close button.
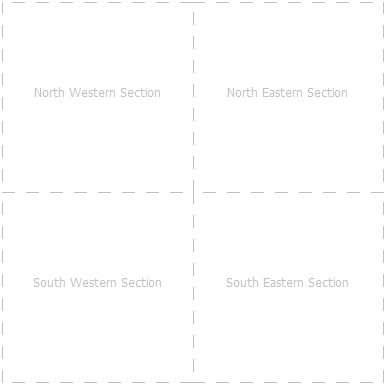
Your drawing should now look something like this:
Entering Plot Calls:
Now you are ready to start entering the plot data.
Plot #1
The first plot will be drawn in the north western section. For this plot, you will be using the same legal description as was used in Tutorial #1.

Create a new layer and call it 'NW Plot'. Enter in the following calls for this plot:
W 410
N 0:44:52 E 1178.49
S 75:45:12 W 390.7
S 80:55:6 W 9.1
S 0:44:51 W 1082.3
E 386.42
Now, Right-Click on the first call in the call list (N 90 W 410) and choose Toggle Call Visibility from the popup menu.
Plot #2
The second plot will be in the north eastern section. Create a new layer and call it 'NE Plot'. Enter in the following calls for this plot:
N 1874
S 88:8 E 2464.7
N 18:36 W 382
N 88:8 W 2342.9
S 362
Now, Right-Click on the first call in the call list (N 0 E 1874 ) and choose Toggle Call Visibility from the popup menu.
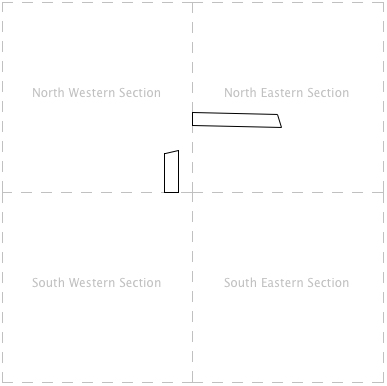
Your drawing should now have plots in two different sections and look something like this: